Why Window Replacement Matters for Home Efficiency and Comfort
Replacing windows is more than just a home upgrade it’s a smart move for comfort, safety, and saving energy. Old windows can let in drafts and raise your energy bills. New windows seal in the air better and block out heat, cold, and noise. One of the best ways to upgrade your home is learning how to replace a window with vinyl siding. This means removing the old window and putting in a new one without messing up your home’s siding.
When installed the right way, vinyl windows can make your house look fresh and work better all year long. They also boost curb appeal and add value if you ever want to sell your home. You don’t need to be a builder to do it—you just need the right steps, tools, and some patience.
Understanding the Basics of Vinyl Siding and Window Installation
Vinyl siding is a popular choice for homes. It protects the house from wind, rain, and dirt. It also gives the house a neat and finished look. But siding is connected to the window frame, so when you want to change the window, the siding can get in the way.
There are two main ways to install a new window: full-frame replacement or insert (pocket) installation. With full-frame replacement, you remove the old window down to the studs and then install a new one. With insert installation, you keep the window frame and only change the window inside it.
Vinyl siding is flexible, which helps when removing and replacing windows. You may need to pull back parts of the siding or cut around it to reach the window opening. Always take care to avoid bending or breaking the vinyl panels.

How to Prepare Your Home for a Window Replacement Project
Before you start the replacement, get your tools and work area ready. Here’s what you’ll need:
- Pry bar
- Utility knife
- Hammer
- Screwdriver
- Caulk gun
- Drill
- Level
- Safety glasses
- Tape measure
- Ladder
Start by clearing the space inside and outside the window. Move furniture and remove curtains or blinds. On the outside, make sure there’s room to set up your tools.
Next, check the window and siding for damage. Look for signs of rot, mold, or water around the frame. Fix any problems before putting in the new window. This helps the new frame stay strong and last longer.
Measuring the Window Opening for Proper Fit and Placement
Getting the right size is key to making your new window fit perfectly. If it’s too small, air can leak in. If it’s too big, it won’t fit at all.
To measure for window replacement:
- Measure the width at the top, middle, and bottom of the opening. Use the smallest number.
- Measure the height at the left, center, and right sides. Again, use the smallest number.
- Check the depth of the window frame. Most vinyl windows need at least 3 inches.
Write everything down. These numbers help you find or order the perfect window for your project. Accurate measurements make the whole job easier and give your house a clean, tight finish.
Step-by-Step Guide: How to Replace a Window with Vinyl Siding
Let’s walk through the steps to replace your window:
- Remove the old window: Use a pry bar to gently take off the trim. Remove nails or screws holding the window in place. Carefully pull the window out of the wall.
- Inspect the opening: Clean the area and check the frame for damage. Repair wood rot or seal gaps before going further.
- Prepare the new window: Dry fit the window in the opening to make sure it fits. If it does, apply caulk around the opening’s edge.
- Insert the window: Put the new window in place. Use shims to level it and fill any gaps. Screw it into the frame securely.
- Check alignment: Use a level to make sure the window is straight and opens easily.
- Seal the edges: Use caulk around the edges of the window to stop air and water from getting in.
- Reinstall the siding: If you removed any vinyl siding, snap it back into place. If needed, cut around the new window for a neat edge.
Congratulations! You’ve just installed a window in your home with vinyl siding.

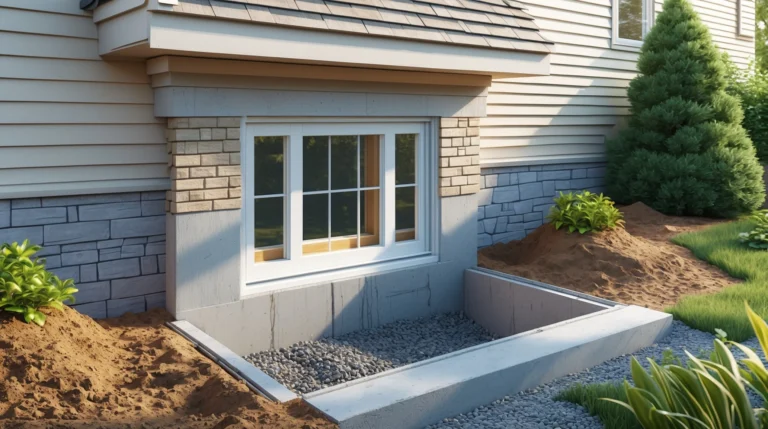
Do You Have to Remove Siding to Replace Windows? What to Know
Many people ask, “Do you have to remove siding to replace windows?” The answer depends on how the siding was installed and what kind of window you’re putting in.
If you’re doing a full frame replacement, you may need to remove some siding to get to the nail fins or install new flashing. But with insert replacements, you can often leave the siding alone.
If you do remove siding, take off only what you need. Carefully pop the panels out using a siding removal tool. Try not to bend them, they’ll need to go back on later. Be gentle with old siding so it doesn’t crack.
Installing Vinyl Replacement Windows from the Outside
Some vinyl replacement windows are installed completely from the outside. This is often easier and cleaner than working from inside the house.
Here’s how:
- Remove the old window from the outside.
- Insert the new vinyl window from the outside of the wall.
- Use shims and screws to hold it in place.
- Apply a bead of caulk around the edges.
- Replace any siding or trim around the opening.
Working from outside keeps the inside of your home cleaner. Just make sure you have a steady ladder and good weather before starting.
Managing Siding Around Windows: Trim, J-Channels, and Flashing
Once your new window is in place, you’ll need to handle the siding around it. The trim makes the window look neat and keeps out water.
Use J-channel pieces around the window frame. They hold the edges of the siding and direct water away. Flashing tape should go under the siding and over the window flanges for extra water protection.
If needed, cut your siding with a utility knife or tin snips so it fits around the new window snugly. Leave a little space so the siding can expand and contract with the weather. Caulk small gaps for a smooth finish.
How to Finish Newly Installed Windows for a Watertight Seal
After installing the window, sealing is one of the most important steps. Without proper sealing, water can leak in and cause mold or damage.
Use these tips:
- Apply caulk around the top and sides of the window trim.
- Leave the bottom edge open or use special weep holes so water can drain.
- Use vinyl casing to cover any exposed wood or siding edges.
- Use foam insulation around the frame inside the wall cavity for better energy efficiency.
Take your time. Smooth caulk looks better and works better, too. This part keeps your window safe from rain, snow, and drafts.

Avoiding Common Mistakes in Window and Siding Replacement
Even careful installers make mistakes. Watch out for these common ones:
- Wrong measurements – Always double-check before ordering.
- Poor sealing – Skipping caulk or flashing can lead to leaks.
- Loose screws or nails – These cause the window to shift over time.
- Bent or cracked siding – Be gentle when removing and reinstalling panels.
- Wrong window type – Not all windows work with vinyl siding. Ask a pro if you’re not sure.
Fixing mistakes later takes more time and money. Doing it right the first time saves stress and gives better results.
Trusted Window Replacement Experts in Stafford, VA – Port Solutions
Not every homeowner feels ready to tackle a full window and siding project. And that’s okay. If you want expert help, Port Solutions is here for you. Our team has experience with all types of windows and vinyl siding, and we handle everything from measurements to final touches.
Based in Stafford, VA, we offer service you can count on, no matter the size of the job. Whether you’re upgrading for energy savings or fixing a damaged window, we’re ready to help.
Want your windows replaced the right way without the hassle? Call Port Solutions today to get expert help that saves you time, protects your home, and improves your comfort.